

10 Must Know Photoshop Tools For Young Photography Enthusiasts. Photoshop is one of the essential software for photography lovers. But if you are in contact with Photoshop for the first time, you will probably be overwhelmed and make you not know where to start. Its interface is full of tools, options, menus …
So in this tutorial I will go straight to specific features, Photoshop tools to help your photography enthusiasts more sublimated with post production.
If you do not have much experience, do not worry because it’s simple! You only need to follow your step by step guide in the article. And you should follow The Biggest Reason You Can Not Manage Your Time to improve yourself.
OK start it!
1. Edit But Not Destroy Image – First of 10 Must Know Photoshop Tools
If possible, you should edit your photos so that they do not destroy the original image. This means you can edit your image as much as you like, but you can always undo any changes or even return to the original image if needed.
One way to edit without destroying images in Photoshop is to use flexible layers. The layers are like a series of transparent sheets stacked on top of your image. You can draw on these sheets, arrange which ones are on top of each other, because they are transparent so you can see the layers below. So your advice is to create a new layer or copy of your original layer before you edit.

Things like text, or copied and pasted objects from another image, automatically create their own layer. If you use the brush tool, you will need to create a new layer manually (click the New Layer button in the layers panel to create it). For a few other common tools, you need a few tricks to use them:

- Spot Healing Brush: To use the Spot Healing Brush as well as a few other tools Magic Wand and Blur, you must create a new layer. Make sure you tick the Sample All Layers option in the tool bar’s Option bar. Now make edits on the newly created blank layer.
- Healing Brush or Clone Stamp: To use the Healing Brush or Clone Stamp on a separate layer, create a new blank layer. On the Option bar of the tool at the top of the screen, In the Sample section, select Sample to Current & Below then make your edits on the empty layer.
- Dodge and Burn Tools: Dodge and burn tools are used to add contrast to individual parts. To use these tools on a separate layer, go to Layer> New> Layer , then in the dialog box set Mode to Overlay. Check the box Fill with Overlay – neutral color . Now you are free to use!
2. Adjustment Layer
The second tool of 10 Must Know Photoshop Tools is Adjustment Layer. Layer Adjustments allow you to make changes to the colors and tones without destroying your image. You can put multiple adjustment layers on your image as you need.

Click the Adjustment Layers icon in the Layers panel and select the type of edit you want. The Properties dialog box will open according to the tool you selected and you just need to move the sliders to make your changes.

The benefit of adjustment layers is that they can be edited at any time. Just double click on the layer to adjust it. You can also use the Opacity slider to refine the effect of the layer.
3. Auto Editting
Photoshop has various automated options for image processing.
The most basic can be found in Menu> Image: Auto Tone, Auto Contrast, and Auto Color. After you’ve applied an app, you can tweak it a bit by going to Menu> Edit, you’ll see the Fade option (such as Fade Auto Tone). It is set to work 100% by default, reduce it if you don’t want it to work too much.

Many other Adjustment options also have automatic adjustments. For example, create an Adjustment layer for Levels, then click the Auto button. You can use this game at the start to see if the results are okay or not, before making your own adjustments. To soften the effect, lower the Opacity in the layer panel of that Levels layer!
4. Making Your Image Hightlight With Levels
A fairly common situation is that when you open the image you just copied it from the camera, your image is much more bland than when viewed on the camera screen. In most cases just adding some contrast will help your image stand out.

The Brightness / Contrast feature is an obvious way of doing this. But you can get better results by using tools like Levels or Curves. Curves are a little harder to access, while you can use them into Levels and get great results.
To open the Levels tool, press Cmd + L on a Mac or Ctrl + L on Windows. Or – my favorite way is – open it on the Layer panel by clicking the Adjustment layer icon in the Layer panel and selecting Levels.
Histogram Chart
What you see below is a histogram showing the tonal range of your image. The x-axis represents brightness, from 100% black on the left to 100% white on the right and all neutral colors in the middle. The y-axis displays the number of pixels for each color tone.

You can use the chart to assess the exposure level of the image. If the pixels are placed to the left of the chart, the image may be underexposed. If they have the weight on the right, it could be overexposed.
When the pixels are aggregated in the middle, it shows the image lacking in contrast, which is why it looks flat.
As a general rule, you want your photo to cover the entire color range, from black to white. You can do this by dragging the tabs below the chart.
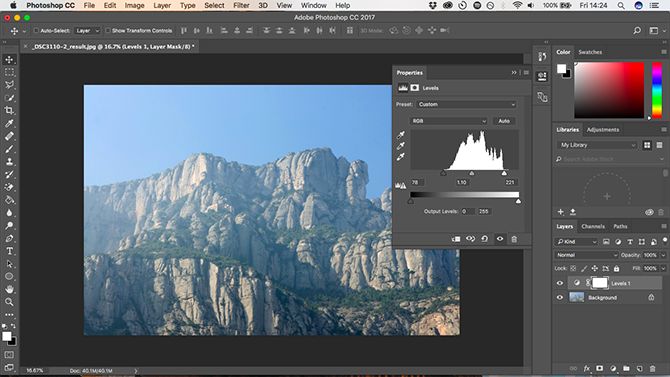
The left button adjusts shadows (areas with shadows or shadows) in the image and the right buttons adjust highlights (areas that receive direct or indirect light). Drag both buttons inwards until they reach the first pixel cluster in the graph.
You will notice that the shadow becomes darker and the corresponding highlights will be brighter, and then you can adjust it to your liking. The middle tab adjusts the midtones (neutral area) – drag it to the left to lighten your image and vice versa.
5. Remove Disability With Spot Healing Brush
No matter how much you care for the photo, there is always the possibility that something in the photo you want to appear. It could be a speck of dust on your camera sensor, a blemish on your skin, or a power line ruining the context you have greatly altered.
And the good news is, you can remove such things very easily in Photoshop using the Spot Healing Brush .
Select the Spot Healing Brush from the toolbar on the left of the screen or press the keyboard shortcut J. Adjust the size of the brush with the [and] keys so that it is just a little bigger than the object you want to erase.
Check if Content-aware is selected in the tool bar’s Option bar. Now click on the location you want to remove, follow if it is an electrical spark or something bigger. It will disappear.
The Spot Healing Brush works best on small areas. It can be used to fix bigger issues, but Photoshop has other tools for those issues.
6. Remove Object By Healing Brush Or Content – Aware Fill
How easy is it to remove an object? Removing something from a background that has many similarities in properties is something that all Photoshop beginners can do. Take a look at the case below.

Spot Healing Brush: Paint on an object using textures and tones sampled from surrounding pixels. Best used for smaller fixes.

Healing Brush tool: Paint over an object by sampling from another part of the same image, it will mix colors and tones to give the best results.
Hold Alt / Option then click to select the part of the image you want to sample. Next, draw on the object you want to remove. Brush gives you a preview of what you will draw, helping you match any pattern easily.

Patch tool: Replace an object by copying a selected texture from another part of the image, and mixing colors and tones.
Cut around the object you want to delete, then click and hold in the selected area and drag the mouse to the part of the image you want to sample. The selected area displays a real-time preview of what the final result will look like.

Clone Stamp tool: Works like the Healing Brush tool, but it copies 100% of the color and texture. It does not mix after you place the sample on another spot, but draws in exactly what the sample has missed.
You may need to try each tool to see which one is best suited to the job you are doing and sometimes you may need more than one.
7. Change Image To Back White
There are many ways to convert a color image to black and white in Photoshop. Some are quite advanced, but there is a simple method that can produce great results for newbies.
We are going to use an adjustment layer again, so click on the icon in the layer panel and choose Black & White.

Immediately you get a gray version of your photo. But don’t just stop there, you can experiment with the Presets (the available settings help reduce the sitting adjustment)!
Next, you can test the sliders. Each slider corresponds to a color in the original image. Dragging down the slider makes the areas containing that color darker, and increasing the slider makes that color lighter. So if you want a dark sky to stand out, you can lower the Blue and Cyan sliders.
Also, try the Tint option. Tick the Tint box and Photoshop will put a color overlay on your image. The image will have a gradation with the color you just selected. Very good effect!
8. Crop Your Image
Crop Your Image is the most popular of 10 Must Know Photoshop Tools. There are many reasons why you may need to crop your photo. To prepare for printing, edit the layout, or even straighten the perspective along the axis of the horizon. The crop tool in Photoshop is fairly easy to use. You can click and drag a frame in any proportion to create a frame that you want to crop or a click on the Photoshop image will let you adjust.
Or you can choose a fixed ratio, Photoshop offers a lot of options for the size and aspect ratio you want to Crop (there are also options for resolution). And above all, you can create your own rate and save it for later.

Whenever you crop, make sure the Delete Cropped Pixels box is not selected. Otherwise you will destroy your image right after clicking ok to crop. You only see the resulting image after you crop it, but the pixels will not be removed. If you want to change, you can go back to Ctrl / Cmd + Z.
The Crop tool also allows you to straighten the horizon in images. Click the Straighten button in the options bar and draw a line along the horizon in your image. Straighten works by rotating the image and cropping the corners, so once again make sure the Delete Cropped Pixels button is checked if you think you’ll probably revise it later.
9. Add Frame
A common way to complement your photos is by adding frames. You will see this option appears quite a lot in the orthopedic app. This is easy to do in Photoshop.

Choose Image> Canvas size. Under Canvas Extension Color, select White (or whatever color you want – this will be the color of your canvas). Then, in the New size section, change the unit to Pixels and enter the number of dimensions for the thickness you want to frame. Enter the same value in both width and height.

You need to test until you see the results you are satisfied with. A good choice to start with is about 2-3% of the width of your image.
10. Save True Format – Final of 10 Must Know Photoshop Tools
Finally, it is about file format.
Standard image file types like JPEG or PNG do not support Photoshop layers. As soon as you save the file in any of the above formats, Photoshop will merge your image into a single layer.
To maintain layers and for you to continue editing future layers, you must save your image in PSD format.

However, if you want to use your edited image on the web or to print it, then you’ll need to save another copy in standard image formats like JPEG or PNG or even PDF.
In short, PSD files are for working and JPEG is versions for uploading or printing.
Conclusion of 10 Must Know Photoshop Tools
It’s easy to get impressive results from Photoshop right from the moment you start using it with the guidelines in this article.
What are your favorite features in Photoshop? Has anyone used the same tools as me? Let me know in the comment section below!